jeudi 5 août 2010

Lathe tools


Lathe tools are called knives or chisels, sometimes interchangeably. They feature long, round, curved handles to afford a solid grip and sufficient leverage to enable the turner to control the cutting edge accurately with minimal fatigue. Common wood chisels simply are too short and are ill-designed for this purpose. Here are a few of the many types turning tools you may find:

How to Use a Wood Lathe

Image:Woodturning1_995.jpg

Wood lathes can be used to create functional furniture components, beautiful decorative wood projects such as candlesticks and bowls, or even toys such as tops and yo yos. These machines range in size from hobby models that fit on a work bench to large industrial-sized machines weighing hundreds of pounds, but they all share some basic elements.

Here are some instructions for using these unique machines.

Steps


  1. Select a lathe suitable for your project. Bench top lathes can be ideal for turning small projects like ink pens and yo-yos, larger machines may be used for making spindles used in furniture and handrail styles. Here are some differences in wood lathe specifications:


    • Bed length is the distance between centers, or the maximum length of the stock that can be turned.


    • Swing is the term used to describe the largest diameter stock that can be turned.


    • Horsepower is the amount of torque the lathe motor develops, which in turn will determine how heavy an item can be turned without overloading this critical component.


    • RPMs are the revolutions per minute the stock can be turned. Here, note that most, if not all lathes have variable speed capabilities. A lathe with a very low speed range allows the user to start a piece of odd shaped, unbalanced stock without excessive vibration, and high speed machines can speed the work while making obtaining a fine, smooth finish easier to achieve.


    • Weight and composition. Heavier machines with cast iron beds and steel frames offer a good, solid work platform, but can be difficult to move if you are operating it in a crowded workshop where you will be storing it when it is not in use.


  2. Select the correct cutting tools for your objective. Lathe tools are called knives or chisels, sometimes interchangeably. They feature long, round, curved handles to afford a solid grip and sufficient leverage to enable the turner to control the cutting edge accurately with minimal fatigue. Common wood chisels simply are too short and are ill-designed for this purpose. Here are a few of the many types turning tools you may find:

    Image:Woodturning6_605.jpg


    • Gouges. These usually have specially shaped cutting edges for performing particular cuts, such as bowl gouges, with concave, curved cutting edges to form the smooth, curved surface of a bowl, or vee, or knurling gouges for cutting grooves or knurls in wooden spindles.


    • Scrapers. These are often flat or slightly curved chisels for removing wood from flat or cylindrical shapes, or for roughing out a shape. Parting tools. These are thin, vee tipped tools for cutting off work pieces.

    • Spoon cutters have a spoon shaped cutting edge and are also often used for shaping bowls.


    • Other tools you may encounter are skew chisels, fluted gouges, spindle gouges, and nose chisels.

    3- Learn the components of your lathe. A basic wood lathe consists of a bed, headstock, tailstock, and tool rest. Here are the functions of each of these parts.


Image:Woodturning8_837.jpg


    • The tail stock is the free spinning end of the lathe, and has the tailstock spindle and the cup center, as well as a hand-wheel or other feature for clamping or securing the work piece between the lathe centers.


      Image:Woodturning11_68.jpg


    • The tool rest is similar to a mechanical arm with a metal guide bar to support the chisel or knife used for turning the work piece. It usually can be adjusted by sliding the length of the bed at its base, with an intermediate arm that can swing from a parallel to a perpendicular position in relation to the lathe bed, and the upper arm, which holds the actual tool rest bar. This assembly has as many as three swivel joints, all of which tighten with a setscrew or clamp to keep it secure while turning is in progress.


  1. Read your owner's manual before proceeding with actual lathe work for specific instructions, features and detailed safety instructions. Keep your owner's manual handy for reference if you decide to purchase accessories for your particular lathe, for maintenance instructions, and for reference to capacities and specifications for your machine.


  2. Choose the lathe operation you are going to begin with. A simple task might be to turn a square or irregularly shaped piece of wood to a truecylindrical shape, often the first step to forming a spindle or other round item.


  3. Select a suitable piece of wood for your project. For a beginner, using a softwood like southern yellow pine, lodge-pole pine, or balsam fir may be a good idea. Look for a piece with fairly straight grain, and few, tight, knots. Never turn a split piece of stock, or one with loose knots, these may separate during turning, and become projectiles traveling at a significant speed.


  4. Square the stock. For example, if you are going to begin with a piece of 2X4 lumber, rip it to a nominally square shape, such as 2X2. You can then chamfer, or bevel the square corners, effectively creating an octagonal piece, which will reduce the amount of wood that must be removed to reach your desired cylindrical shape.


  5. Cut the stock to the desired length. For a beginner, starting with a relatively short length, less than 2 foot long for an intermediate, or medium sized lathe, is a good choice. Longer work pieces are difficult to true, and maintaining a uniform diameter along the length of a longer piece can take a lot of work.


  6. Mark the center of each end of your stock, and position it between the lathe centers. Assuming the tailstock is not locked in position, slide this until it pushes the cup center into the tail end of your work piece. Using the hand crank, tighten the tailstock spindle so that it pushes the stock into the spur center, mounted on the headstock spindle. Make sure the work piece is securely held, and all clamps are tightened, otherwise, the work piece may fly off the lathe while you are turning.

    Image:Woodturning12_73.jpg


  1. Position the tool rest parallel to the length of the work piece, keeping it far enough back to allow the work piece to rotate without hitting it, but as close as possible. A good working distance is about 3/4 of an inch. Remember, the closer the tool rest is to the turning work piece, the more leverage and better control you will have with your knife (chisel).


  2. Free spin, or hand turn the work piece to make sure it doesn't hit the tool rest. It is a good practice to always turn a work piece by hand before turning the lathe on, making sure it has sufficient clearance.


  3. Choose the knife you will use for the turning operation. A roughing gouge is a good choice for beginning to turn an irregular or square work piece down to a round shape. Practice holding the knife on the tool rest, using your left (again, for right handed persons) hand on the metal blade behind the tool rest, and your right near the end of the handle. Keeping your elbows in, and braced against your body will give you better control of the tool.


    Image:Woodturning14_429.jpg


  1. Turn the lathe on, making sure it is at the lowest speed setting. Place the cutting edge of the tool on the rest, keeping clear of the rotating work piece, check your grip, and slowly begin easing it toward the work piece. You want to
    move in toward it perpendicular to the work piece, until the cutting edge just touches the wood. Forcing it or moving too quickly will cause the tool to jam into the wood, and it will either break off, or you will lose your grip on the tool if the lathe doesn't stall out. This is one of the most dangerous steps in beginning turning.


  2. Feel the resistance of the cutting edge and watch the size of the chips being cut from the work piece. When truing, you will want to cut small chips, less than 1/4 of an inch in length.


  3. Begin moving the cutting edge parallel to the rotation of the work piece, continuing to make a light cut along its length. When using a roughing gouge or similar tool, you cancant, or pitch the tool edge so chips are thrown at an angle from the work piece, so you do not become covered with them while you turn. Twist the tool slightly and observe the flight path of the chips to adjust it so they fly away from you to your right or left.


  4. Continue pushing the tool into the stock gradually, in passes, so that you remove a roughly equal amount of wood with each pass. This will eventually cut away the angular corners, leaving your work piece round, and with practice, cylindrical in shape.


  5. Stop the lathe frequently when you are just beginning, to check your progress, look for stress cracks in the wood, and clear debris which may begin to accumulate on the lathe bed. You may want to use a pair of calipers to check the diameter of your work piece along its length so you finish with the desired diameter.


  6. Smooth the finished round work piece by increasing your lathe speed, and holding your cutting tool so it barely contacts the wood, then moving it slowly along the work piece’s length. The slower your tool movement, and finer, or lighter the cut, the smoother the finished cut will be.


  7. Sand the work piece when you are finished cutting if desired. You can sand the stock by hand while it is turning if you use caution. Turn the lathe off, and swing the tool rest out of the way, then select a suitable grit and type of sandpaper for this process. Turn the lathe back on, and hold the paper lightly against the wood, moving it back and forth to prevent removing too much wood from one area of the work piece.


Wood turning work step by step


Trimming the bark: Bill trims an Elm greenwood log for hollow vessel turning. The elm tree was cut down in Lafayette California because it was interfering with electrical power lines.


Mount the wood on the lathe: The turning blank is mounted with faceplate and live center in the tail stock. The blank diameter does not allow room for the tool rest on the lathe bed to be used so an auxiliary tool rest is used clamped to the lathe table.


Reduce Speed: Homemade "jack shaft" speed reducer cuts the lathe speed to about 400 rpms. The reduced speed is sometimes necessary for unbalanced turnings. The lower speed seems to work fine for all round turning and sanding as well


Rough turned cylinder:The turning blank is rough turned to a cylinder shape and is ready for exterior shaping.


Shaping the exterior: The tool rest is removed to better display the exterior shape of the soon to be hollow turning.


Hollowing begins: The laser light is shown on the lip of the vessel as the cutting tool moves in the opening.

wood lathe workes part 2


End hollowing: The cutting tool is nearing the bottom of the vessel and the laser light shows that the turning is approaching the final wall thickness


Cutting the bottom: The hollowed vessel showing the parting tool cut leaving about one inch diameter connection with the faceplate mounted blank end. At this point the vessel is removed from the lathe remaining attached to the faceplate and allowed to dry for a couple of days. The vessel bottom dries better if parted in the fashion shown.


Sanding the exterior: After drying for a couple of days the vessel is remounted on the lathe for final exterior sanding using a foam pad drill mounted sander. Sandpaper is used to sand in the vessel opening as far as one can reach. Final sanding is done using up to 600 grit sandpaper.


Remove from faceplate: The hollow turning is band sawed free of the wood base and faceplate


Carve bottom: An air die grinder and power carver is used to remove the bottom attachment. The bottom of the vessel is allowed to dry for a day or two.


Sand bottom: The vessel bottom is now sanded with a foam sander.

Lathe Dust Hood


Lathe dust collection has never been easier! Hood assembly features a hinged viewing shield that can swing up and out of the way. Includes convenient mounting bracket that allows easy installation onto many different styles of lathe. For use with 4" hose.

How to Use a Mini Copse Lathe


Designing Handcrafted Custom Autograph Pens

Read added at Suite101: How to Use a Mini Copse Lathe: Designing Handcrafted Custom Autograph Pens

Designing and axis handcrafted copse autograph pens on a lathe has become a admired accomplished time for copse enthusiast aback the average of the 20th-century. The final adorableness of the autograph pens are an accomplished chat allotment and are bound acceptable ancestors heirlooms, which will be anesthetized from bearing to generation.

Tools and Equipment Required For Pen Turning

Designing autograph pens requires some basal woodworking tools, such as a mini lathe, assignment press, and a Pen Assembly Press. It additionally takes an Oval Skew Chisel, a Spindle Gouge, and a Parting Tool. Although the pen maker can, duke carve the pens and assignment the centers on a assignment press, it is far easier to use a multi-speed mini lathe, giving the pen maker abounding ascendancy over the conception of axis the pen.

Preparing the Pen Blanks

Mark and analyze the top and basal of the pen blank. The copse turner should additionally attending for any absorbing atom designs, or defects in the pen bare that could account the pen banal to able or aberration aback turning. Once the pen bare has been marked, cut it in two on a bandage saw.

The additional footfall in authoritative a pen is conduct the pen blank. Align the pen bare with the assignment bit, in the assignment press. The bore of the assignment bit is bent by the admeasurement of the automated belly of the pen actuality created.

Use an awl to announce the centermost of the pen blank. Assignment appear the end of the cap or basal of the pen blank. The assignment acceleration should circle at 500rpm. The pen maker should go boring as they abreast the end of the pen blank, so not to assignment all the way through.

Read added at Suite101: How to Use a Mini Copse Lathe: Designing Handcrafted Custom Autograph Pens

Gluing the assumption pen tube, and account the assumption tubes with a 120 or 150-grit sandpaper. Administer some cement to the arch bend of the assumption tube; a 5-minute adhesive will assignment best. Set abreast for about 20 account to assure the cement or adhesive is absolutely cured.

Turning the Copse Pen on the Lathe

Place the pen on the lathe with the top of the pen at the arch of the lathe. First, annular the ends of the bare to abreast the bushing bore with a ½-inch Skew. Once the bore is reduced, the pen turner will alpha alive from the centermost to the edges of the pen in continued connected distinct passes.

Shaping the pen bare is done with a 3/8-inch Spindle Gouge. The pen turner will cut from the edges into the centermost of the pen bare to accord it a asperous shape. If the pen bare has blemishes or chips, the pen maker should accomplish aliment with a admixture of adhesive and pen balance of the aforementioned blank.

Using average emery sandpaper, the pen maker will wet beach the apparent of the pen. Affective from a average dust to a accomplished dust paper, and charwoman the apparent amid anniversary pass, to ensure there is no body up of sanding dust. To abstain sanding scuffs on the surface, accumulate the sanding cardboard affective and accumulate the edges of the sanding cardboard abroad from the surface.

Finishing the Copse Pen Set

To abolish any apparent scratches, the pen maker will administer micro cutting adhesive to the pen bare with a apple-pie cloth. With the lathe running, accumulate the bolt affective aback and alternating beyond the pen blank. Backlighting the activity will acquiesce the pen maker to see area on the apparent needs added polishing.

Assembling The Handcrafted Board Pen

The final footfall is accumulating the accomplished pen. The pen brand will abode the top and basal sections of the pen assimilate the Pen Assembly Press. Starting with the top area columnist the automated pieces of the pen into the top and basal accomplished pen blanks. Once the automated belly accept been inserted, the pen is accumulated and accessible for use.

Wooden pen sets booty on the personality of the copse turner, and anniversary pen set will appearance the adulation the copse adept acclimated to actualize them. They are best stored in custom board boxes, with the date of the conception and the name of the copse enthusiast’s name engraved on the basal of the pen box. If the copse enthusiast does not accept a copse lathe, again apprehend this commodity on application a assignment columnist to accomplish copse pens.

Read added at Suite101: How to Use a Mini Copse Lathe: Designing Handcrafted Custom Autograph Pens

Wood Lathes


When a alpha woodworker, you best acceptable aren't yet able for a copse lathe. Having said that, if you accept are at the point in your copse alive area you are austere about outfitting the boutique with the appropriate accoutrement possibly this apparatus is absolutely one you should consider.

The basal operation of the apparatus is accessible to understand; you abode your assignment account it the lathe and it spins around. You again use tools, like gouges and chisels to advice carve the wood. That actuality said though, there is added to the apparatus that this. Copse lathes alter in capital appearance like horsepower, bed size, swing, additional set or adjustable revolutions per minute(RPM) . A main, although oftentimes ignored, affection is the chuck. This is the allotment that secures our copse in abode while it turns. You will appetite to accept the advantage of captivation the copse amid the aperture of the abandon or blame the assignment account appropriate on to the chuck. This is accessible for disconnected you will be captivation by alone one end, such as a copse bowl. Your accurate needs care to actuate what of these capabilities will be must-have for you.

Like abounding ability equipment, there are assorted labels to accept from. Best of these makes will apparently be able-bodied accepted to you: Delta, Craftsman, Ohio Forge, Grizzly, Jet, Oliver, Glaser, Rikon, Stabilax, Powermatic, Supernova, and alike Tranpower. You about absolutely accept got your admired manufacturer, about you'll appetite to attending into comparisons so that you accomplish abiding you get the capabilities you require. Your copse lathe isn't a baby purchase, for this acumen try to do your appointment afore purchasing.

Turning a Baby Cradle

cradle is a traditional baby holder. It's designed to hold the baby while you have your hands full. Often it has rockers so that you can get a little motion going to help keep the baby occupied and maybe even convince them to sleep.

Creating a cradle from wood turning components is a very satisfying project. If you've got a child or a grand-child coming, this might be the project for you!


In this project, JoHannes Michelsen shows us how he made a baby cradle for his new grandson.

He takes us through all the steps needed to create the legs, the base, the spindles and the rails. Then he assembles the crib using these components to make one of the most stunning cradles we've ever seen!

You may never made a cradle yourself but following this project will give you a great appreciation of the work and dedication that were involved in making this baby cradle.

Alabaster on the Lathe

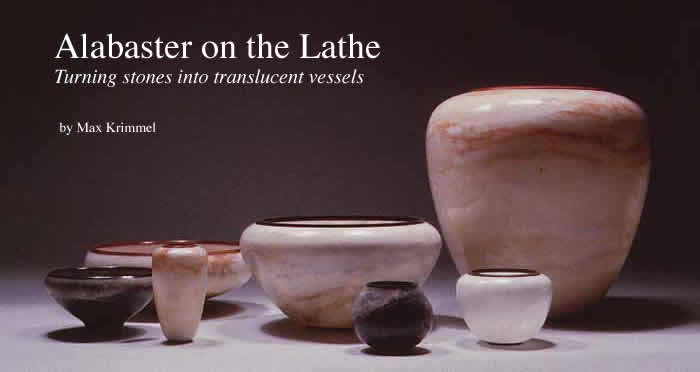
An ordinary woodturning lathe can be used to cut and polish alabaster until it glows with translucent colors. The author's red and pink vase on the right is 10 in. tall and the small pink vase is 2 in. in diameter.


Turning rocks is tricky, but that just adds to the fun. And delicately colored stones like alabaster, when turned, develop a pleasant translucent glow. I conduct turning workshops across the country and have been impressed at the popularity of alabaster work. I suppose that's not too surprising considering turners are such an adventurous lot, eager to chuck on anything from a worn-eaten tree trunk to a variety of fruits and vegetables. In addition , you don't need any special equipment for alabaster, nor and special techniques. The process is just like scraping out a wood bowl, only slower, although alabaster does have a couple of personality quirks. It's not so much that the material is contrary as that it is different and takes a little getting used to.

Alabaster is crystalline form of gypsum (calcium sulfate), which is the main ingredient in Sheetrock. Gypsum rates a #2 on one commonly used hardness scale (talc being #1 and diamond #10).You might notice some variation in hardness from piece to piece, but even though it's rock, all alabaster is soft. Impurities are responsible for its subtle colors, which can range from translucent white through pinks, to browns, grays and greens. The turned pieces are a bit like crystal wine gasses - lovely, but if you drop one, that's that.

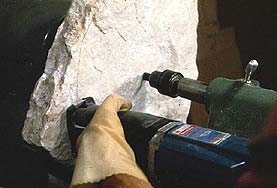
You can rough out the alabaster blanks with any variable-speed reciprocating saw and a large-tooth or bimetal blade. A bandsaw running bimetal skip-tooth blades at slow speeds will cut alabaster. The low-tech chisel-and-mallet approach also works fine. Currently, I'm mounting the rock on the lathe and using an air chisel to knock off enough material to balance the piece, then using a narrow scraper known as a Stewart Slicer (available from Dennis Stewart, 2502 N.W. 4th Ave. Hillsboro, Oreg. 97124; 503-640-3089).

For the actual turning, I use carbiade-tipped scrapers. Commercially available woodturning tools are fine, but I made my scrapers by unbrazing carbide tips from old router bits, then rebrazing them onto square-stock steel (available from KBC Tools, 6300 18-MIle Road,

Sterling Heights, Mich. 48078; 800-521-1740, or 800-482-1047 in Michigan). You can order tools specially made for alabaster from Jerry Glaser, 8341 Delgamy Ave. Playa del Rey, Calif. 90293. I sharpen my carbide tips with a 120-grit silicon carbide (greenstone) wheel.


High-speed steel scrapers are best for the finishing cuts (see top, right photo on the next page). The steel edges aren't as durable as carbide, but they produce a cleaner cut, probably because they can be sharpened to a finer edge. I grind the ends square with no bevel. This way I can use one side until it is dull, then flip it over and use the other side. These high-speed steel scrapers are available from Craft Supplies USA, 1287 E. 1120 S., Provo Utah 84601; (801) 373-0917. Craft Supplies also sells double-faced tape, the type of pin chuck I use (the version included with combination or six-in-one chucks) and Hot Stuff cyanoacrylate glue, which is invaluable for holding the work together.

Alabaster can be crumbly because of fractures and stresses within the stone, so it can break easily on the lathe. I turn each bowl as thin as I dare, usually about 1/8 in. to 3/16 in. My current success rate is about 80% and would be even lower if it were not for the cyanoacrylate glue. Once the outside is roughed to shape, use thin "original" Hot Stuff on anything that even looks like a fracture in the stone. If the glue soaks into the crack, I go over it with the thicker "Super T" Hot Stuff and then spray on the Hot Stuff Accelerator, which speeds glue hardening. If the glue doesn't seem to flow into the crack at all, I assume the crack just looks like a fracture. I repeat this procedure whenever I get nervous about things breaking, usually on the inside when the piece is about 1/4 in. thick and always just before the final thickness.


Safety hazards - Be aware: There is always a chance that block will shatter. Even if everything is going well, dust is a problem. Alabaster dust is similar to Sheetrock dust, so wear a dust mask or a respirator,


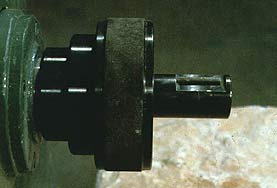
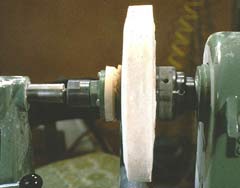
A pin chuck, fit into a center hole drilled in the rim side, holds the blank.


The blank can be rough cut round with a reciprocating saw.

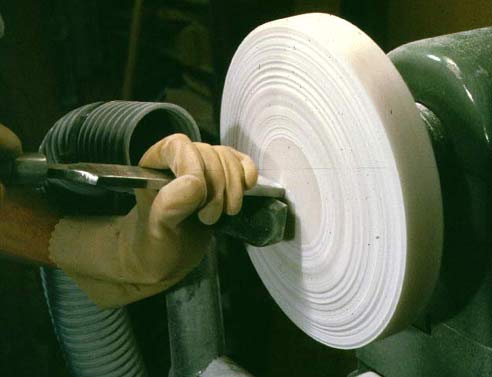
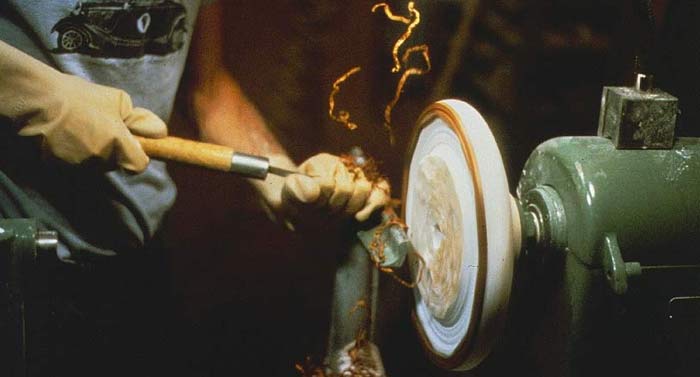
Initial scraping with carbide-tipped tools brings the stone into rough shape. Here, the bottom of the bowl is being trimmed flat with a high-speed steel scraper


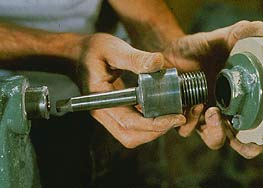
Above: To center and clamp the preturned wood base to the piece, the author uses a stub with the proper Morse taper for the tailstock on one end and threads for a faceplate on the other. The base is then glued to the stone using the tailstock as a centering clamp. Wooden rim segments are applied with cyanoacrylate glue.


Below: Turning procedures are much the same as for scraping cuts in wood.


use a dust collector and if possible, work outside. I use a Makita 410 dust collector, with its intake nozzle mounted near the tool rest. This clears the air and helps keep the dust out of the headstock bearings. In addition to breathing problems, the dust can dry out your skin severely, so I wear latex gloves. Of course, wear a face shield: These are rocks, not wood chips, that will be flying off the lathe. I recommend steel-toe shoes, because the rocks are quite a bit heavier than wood, and if you turn enough of them, you will inevitably drop one off the lathe. The last time this happened to me, the 105-LB. piece hit the floor and rolled through the wall.


Attaching alabaster to the lathe - I usually start with a pin chuck from the rim side, then proceed as shown in the photos on the facing page. The only unusual gadget I use is a device to center and clamp the preturned wood base to the piece. It is a simple stub with the proper Morse taper for the tailstock on one end and threads for a faceplate on the other end. With the bowl on the headstock and the base on the faceplate, I screw the base/faceplate assembly onto the stub, insert the stub into the tailstock, then wind the tailstock out until the base and bowl connect. This avoids turning a mortise and tenon to center the bowl on the base.

You can also adapt other chucking systems to alabaster. You can grind a flat on what will be the base of the piece with a belt sander, glue on a preturned wood base, glue or, for small pieces, double-tape a waste block to this base and screw a faceplate to the waste block. Or, you can grind a flat on the rim side, tape it to a faceplate, turn the outside, then glue on a base and waste block as before. Use whichever method seems most comfortable to you.

Turning techniques - You must rely on a fairly gentle touch as you turn, because alabaster isn't flexible. The rotational energy of the lathe must be absorbed by the tool, the tool rest and your hands, or by the scraping away of the stone's surface. Too much pressure or a slip with the scraper either stops the lathe, knocks the piece off the faceplate or breaks the stone.

You will likely find two additional crystals in alabaster: quartz and selenite. Quartz crystals are very hard and may be as large as a pencil eraser or as small as a grain of sand. You will feel them and hear them; they will take the edge right off your tool, sometimes making sparks as they do so. If you run into quartz, stop and dig it out. My "quartz digger" is simply a concrete nail with a piece of wood for a handle. Selenite is another crystalline form of gypsum. It usually is found on the outside of the rocks and looks similar to mica. You can cut selenite, and if it runs deep in to the rock, it can yield spectacular results. But, selenite crystals usually separate from the rest of the piece, so keep filling with Hot Stuff as you turn, as this will sometimes keep the crystals in place.

If you decide to permanently attach a wood base or rim to the alabaster, the Hot Stuff glue makes a good permanent bond. Whenever one of my joints has failed there has always been a layer of alabaster left attached to the wood, indicating the stone, not the glue, as the weak link. Just remember: The wood will move as its moisture content changes; the stone will not. With wood pieces as small as the rims on these bowls, wood movement doesn't seem a problem; with the larger pieces, it can be. After the piece is turned, finish all surfaces of the base with a moisture-sealing finish.

Finishing alabaster - I first sand the surface with 36 grit for rougher shaping, working up through 15-micron sandpaper (available from The Luthier's Mercantile, Box 774 412 Moore Lane, Healdsburg, Calif. 95488; 707-433-1823) for that final glow. I use all the sandpaper dry. My favorite finish is paste wax, but you might prefer lacquer or the traditional oil finishes commonly applied to wood turnings.

Finding alabaster


I get most of my stone from Colorado Alabaster Supply, 1507 N. College, Ft. Collins Colo. 80524; (303) 221-0723. Stan Jones, the owner, says that the company deals mostly be the ton, and small pieces suitable for turning are, in effect, waste that may or may not be available at any given time. You may have to wait six weeks to two months for delivery of a small order. Typical cost is as low as 30¢ to 35¢ per pound, with a nominal handling charge.

I suggest you start with a 20-lb. to 30-lb. block, which in my experience, would be large enough for a 6-in. by 2-in. bowl. Drill cores of 2 in. to 3 1/2 in. in diameter are sometimes available, too. Here again, if you want 500 lbs. of cores, Jones will be happy to core out as many rocks as necessary; if you want 10 lbs. and he is out, the order might take a while.

A speedier yet more expensive route is to order from a specialty supplier. Sculpture House (30 E.30th St. New york N.Y. 10016; 212-679-7474 has alabaster (mostly imported Italian) for immediate shipment and will help you figure out what to order ever the phone. Cost is $1.50 per pound, and the minimum order is $50.

You might be able to obtain the rock from local sculptors or sculpture-supply houses as well: Alabaster is a very popular carving stone. Here in the West, you can often find alabaster at rock shops along the highway. If they don't have it, they probably know who does.

Another approach is to become a prospector. which gets you the best prices of all, usually free. Look for places on the map with names like Alabaster, Gypsum or Plasterville. Gypsum, the main component of Sheetrock, is fairly common, and where there is gypsum there will be alabaster. By asking around, you can usually get permission to dig it. The question is whether or not it will be solid enough and large enough to be useful. Here's how to test: You want a piece that gives off a good ring when struck. Pick the piece up and give it a sharp tap. (My favorite tapper is a wooden-handle rigging axe, which is a framing hammer that combines a typical hammerhead with a hatchet face instead of a claw.) A solid piece will have a clear clink or a ring. If you get the sound of an indistinct "thud," look for fractures and break off anything that looks loose, or try holding the piece differently, then tap again. this is easy for a 20-lb. rock. With a 150-lb. rock, however, it is more of a problem; still you can usually balance it on a corner and get a ring. With a 500-lb. rock, good luck! -M.K.

One final caution about finishes: Your bowls must be purely decorative or at least reserved for the storage of dry goods, because alabaster dissolves in water. How quickly? Well, a few drops of water on a waxed alabaster surface probably won't make marks, but I once filled a bowl with water and the liquid noticeably etched the surface in half an hour. Obviously, if there is a fracture in the piece where water can seep through, things will only get worse. To avoid this kind of damage, I sometimes lacquer the inside surface, especially on enclosed shapes. I don't especially like the look or feel of the lacquer, but it is hard to see inside these enclosed vessels anyway. I also think that with enclosed shapes it is more likely that someone down the line will l put water in them. In those cases, lacquering should work fine, unless a possible natural fracture in the stone eventually causes the lacquer to check.

One of the best rules when beginning to work with alabaster is that if at first you don't succeed, keep trying. As I mentioned earlier, about 20% of my starts are failures, but in the beginning, they were more like 40%. Half of these are due to excessive concentrations of quartz or structural problems with the stone, and half are just my mistakes. Have fun: After all, that's the ultimate point of it all.

Multicenter Lathe Statue: A Experimental Test Project

Some time ago I decided to try Multicenter Wood Turning or as some write Multi-Center Turning. I'm not good with hyphens... I think If I ever get around to blogging about English Grammer it would definaiely be
filed in complaints. Anyway I wanted to try multicenter turning because it looked like a fun thing to do and figuring out how to turn something on a lathe using multiple set ups so the axis of rotation changes with each set up seemed fun. Especially considering that the work is off balance the entire time. Another thing I like to do is not spend money so rather than buying a nice big piece of wood that didn't have any knots I cut op various pieces of scrap and glued them together to make a bigger piece. I use this lamination technique often because it tends to create interesting patterns in the wood. So I glued it all up into a relatively flat piece then cut that piece at odd angles, drilled holes into the lamination and inserted wood dowel pins with more glue.

After letting it dry overnight I mounted it onto my home made lathe mandrel. I thought that the piece was a little short so I glued a couple more pieces of scrap wood on the end (right side in picture). The wood is a mix of redwood from a deck my neighbor cut up and shipping pallets from work. I had no particular shape in mind when cutting the wood and gluing it up because I wasn't even sure that this was going to work. Sometimes when you try to make something look a particular way it becomes obvious that you have produced a crappy piece of work when it doesn't look right. If you start out with the intention of creating 'beautiful free form art' you can end up with pure crap when you are done but it's 'art' so no matter how crappy it is that's OK - takes the pressure off!